Have you ever considered adding a unique touch to your floors with a 3D resin finish? In this article, we will explore what exactly a 3D resin floor is and the numerous benefits it offers, such as customizable designs, durability, and easy maintenance. We will also discuss the materials and tools needed for laying a 3D resin floor, along with a step-by-step guide on how to do it yourself. We will provide tips for maintaining your 3D resin floor and common mistakes to avoid during the installation process. If you’re looking to upgrade your flooring with a modern and stylish twist, keep reading to learn more!

What is a 3D Resin Floor?
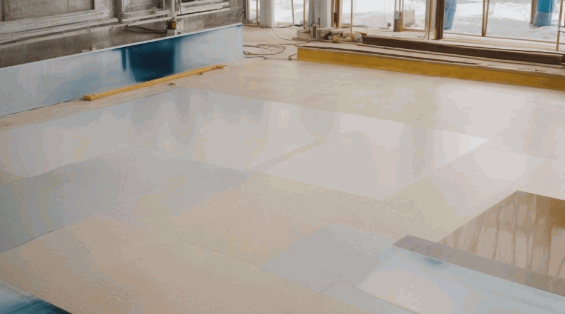
A 3D resin floor is a modern flooring solution that involves the installation of a seamless and glossy resin surface with unique 3D designs.
This innovative flooring option creates a visually striking effect by incorporating depth and dimension into the floor’s surface. The installation process begins with preparing the existing floor, followed by applying the resin mixture. The 3D designs can range from intricate patterns to realistic images, providing a customizable touch to any space. The seamless finish not only enhances the aesthetic appeal but also offers durability and ease of maintenance. Whether used in residential or commercial settings, a 3D resin floor elevates the ambiance and adds a touch of modern elegance.
What are the Benefits of a 3D Resin Floor?
A 3D resin floor offers a range of benefits such as high quality, durability, and aesthetic enhancement, making it an ideal choice for home improvement projects.
The high quality of a 3D resin floor ensures a long-lasting flooring solution that can withstand heavy foot traffic and daily wear and tear, making it a practical option for both residential and commercial spaces.
The durability of this type of flooring means that it requires minimal maintenance, saving time and money in the long run. Its sleek and modern aesthetic appeal adds a touch of sophistication to any room, while the versatility in design options allows for customization to suit various décor styles, thereby enhancing the overall look of the space.
Customizable Designs
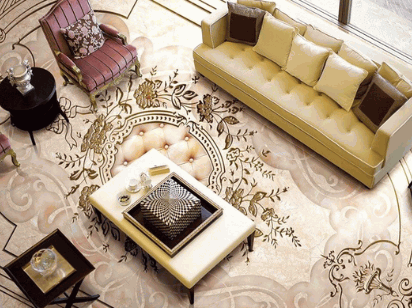
One of the key benefits of a 3D resin floor is the ability to create customizable designs with unique patterns and a wide range of color options, allowing for creative expression in flooring.
This customization aspect provides endless opportunities for personalization, making each floor a one-of-a-kind masterpiece. From geometric shapes to intricate motifs, the design possibilities are truly limitless. The variety of patterns available caters to different styles and preferences, whether you prefer a sleek modern look or a more traditional aesthetic. The color options further enhance the customization, enabling you to match the floor to existing decor or make a bold statement with vibrant hues. The flexibility offered by 3D resin floors ensures that you can achieve the perfect blend of creativity and functionality in your space.
Durable and Long-lasting
3D resin floors are known for their durability and long-lasting properties, featuring excellent wear resistance that ensures a lasting and pristine surface for years to come.
These floors are crafted to withstand heavy usage in various settings, be it residential, commercial, or industrial. The advanced technology and high-quality materials used in their construction enable them to maintain a smooth surface even in high-traffic areas, making them ideal for spaces that experience constant foot traffic or heavy equipment use. Their longevity means that they require minimal maintenance and upkeep, saving both time and costs in the long run.
Easy to Clean and Maintain
Maintaining a 3D resin floor is hassle-free due to its smooth surface, making it easy to clean and requiring minimal maintenance to preserve its aesthetic appeal.
Unlike traditional flooring options that may require frequent waxing or polishing, 3D resin floors typically only need regular sweeping or mopping to keep them looking fresh. The surface is resistant to stains and scratches, further simplifying the upkeep process. The durability of resin floors means that they can withstand high-traffic areas without losing their shine, adding to their low-maintenance appeal.
Resistant to Stains and Chemicals
3D resin floors are resistant to stains and chemicals, thanks to their protective coating that ensures a seamless look while providing excellent protection against spills and stains.
These floors are particularly suitable for areas that are prone to spills or chemical exposure, such as kitchens, laboratories, or industrial facilities. The protective coating acts as a barrier, preventing substances from penetrating the surface and causing damage. This makes maintenance easier and ensures that the floors retain their aesthetic appeal for a longer period.
The seamless appearance created by the coating not only enhances the overall look of the space but also eliminates the risks associated with uneven surfaces, making them safe for everyday use.
What Materials and Tools are Needed for Laying a 3D Resin Floor?
To lay a 3D resin floor successfully, you will need essential materials and tools including epoxy resin, a DIY guide, and specific equipment for the installation process.
Epoxy resin is the core material for creating the 3D effect on the floor, providing durability and a glossy finish. The DIY guide serves as your step-by-step manual, offering instructions on how to mix and apply the resin correctly. In addition, specialized tools like a notched trowel help spread the resin evenly, while a squeegee ensures smooth application. Other vital items include a mixing bucket, protective gear such as gloves and goggles for safety, as well as a level to maintain an even surface during installation.
Resin Flooring Kit
A resin flooring kit is essential for achieving a professional finish on your 3D resin floor, providing pourable resin that ensures a seamless and high-quality result.
With a resin flooring kit, you can transform ordinary floors into stunning, glossy surfaces that not only look beautiful but are also durable and easy to maintain. The pourable resin in these kits allows for a smooth application process, eliminating the need for grout lines or seams that can trap dirt and moisture. This seamless finish not only enhances the aesthetic appeal of your space but also creates a hygienic environment, making it ideal for both residential and commercial settings.
The versatility of resin flooring kits enables you to customize your floors with various colors, patterns, and textures, adding a touch of uniqueness to your space.
Primer
Primer is crucial for preparing the surface of your floor, ensuring proper adhesion of the resin, and controlling the coating thickness during the application process.
It acts as the foundational layer that sets the stage for the successful application of a 3D resin floor. By effectively priming the surface, you create a strong bond between the substrate and the resin, preventing issues like delamination or peeling. The primer enhances the adhesion properties of the resin, promoting a durable and long-lasting finish. It plays a key role in controlling the thickness of the coating, ensuring a uniform application for a smooth and seamless final result.
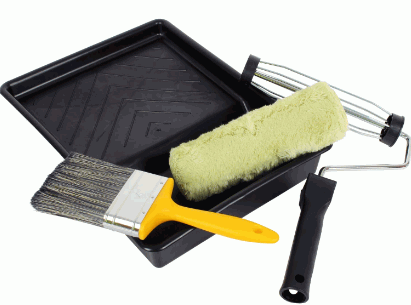
Roller and Brush
Roller and brush are essential tools for applying the resin to your floor, along with a squeegee for spreading the material evenly and achieving a smooth surface.
The roller helps in evenly distributing the resin across the floor surface, ensuring a consistent thickness and coverage. Its mechanism of rolling the material allows for a seamless application, avoiding any visible brush strokes or patchy areas.
Likewise, using a brush is crucial for reaching corners and edges that may be difficult to cover with a roller alone.
The squeegee, on the other hand, plays a vital role in leveling the resin and removing excess material, facilitating a uniform and flawless finish. Together, these tools are key to achieving a professional-looking 3D resin floor.
Protective Gear
Wearing protective gear is essential when working with resin floors to ensure safety and prevent exposure to harmful fumes, emphasizing the importance of proper ventilation during the installation process.
Proper ventilation plays a crucial role in dispersing any fumes that may arise during the application of resin flooring. It is imperative to wear a respirator mask equipped with filters to protect your respiratory system from inhaling potentially hazardous vapors. Donning safety glasses and gloves is necessary to shield your eyes and skin from any accidental contact with the resin material. These precautions not only safeguard your health but also contribute to a more efficient and successful installation process.
Step-by-Step Guide for Laying a 3D Resin Floor
- Follow this step-by-step guide to lay a flawless 3D resin floor, incorporating techniques for leveling the surface and achieving a professional finish in your home improvement project.
To begin the installation process, ensure the area is clean and dust-free. Prepare the substrate by patching any cracks or imperfections, and then proceed to apply a primer specifically designed for resin flooring.
Next, mix the resin and hardener according to the manufacturer’s instructions, ensuring a thorough blend. Carefully pour the resin mixture onto the floor, spreading it evenly using a squeegee. Use a roller to remove any air bubbles and achieve a smooth texture.
Allow the resin to cure as per the recommended time before applying a topcoat to enhance the glossiness of the finish.
Prepare the Surface
Surface preparation is key to a successful resin floor installation, ensuring the right temperature, humidity levels, and conditions for optimal adhesion and curing of the resin.
Properly preparing the surface is crucial as it sets the foundation for the entire installation process.
The temperature of the environment plays a significant role in the curing process of the resin, as extreme temperatures can affect its ability to bond properly.
Controlling humidity levels is essential to prevent issues such as bubbling or uneven drying.
Environmental conditions, such as dust or moisture, must also be taken into consideration to avoid any imperfections in the final result of the 3D resin floor.
Mix the Resin and Apply Primer
Mix the resin according to the recommended ratio and apply the primer to ensure proper adhesion, considering the pot life of the resin for optimal application results.
Once the resin is thoroughly mixed, it is crucial to follow the manufacturer’s instructions carefully. Proper application of the primer creates a strong bond between the subfloor and the resin, ensuring longevity and durability. Understanding the pot life of the resin is essential as it determines the time available for application before the mixture begins to harden. By adhering to the specified pot life, you can achieve a seamless finish without risking any imperfections. Following these steps diligently is key to a successful installation of a flawless 3D resin floor.
Pour and Spread the Resin
Pour and spread the resin evenly on the prepared surface, ensuring a self-leveling application for a uniform and glossy appearance on your 3D resin floor.
This process is crucial to avoid any uneven patches or air bubbles in the finish. Begin by pouring the mixed resin into the center of the floor and use a trowel or spreader to push the resin toward the edges. Work methodically across the entire surface, making sure there are no gaps or missed spots. As the resin spreads, it will naturally level itself out for that professional-looking finish. Take your time and pay attention to detail to achieve the desired glossy effect.
Add Design Elements
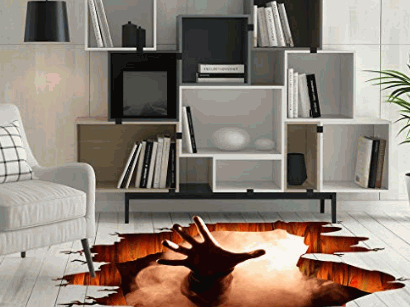
Enhance your resin floor by adding creative design elements to create decorative flooring with unique patterns, colors, and aesthetic appeal that elevate the visual interest of your space.
By exploring the versatility of resin floor design, you can achieve a truly distinctive look that reflects your personal style and complements the overall aesthetic of your home or business.
From incorporating shimmering metallic accents to intricate geometric patterns or even capturing the look of natural elements like marble or wood, the possibilities are endless.
Customizing your resin floor allows you to transform a functional surface into a work of art that adds character and charm to any room.
Let your imagination run wild as you turn your flooring into a statement piece.
Discover: How To Make Epoxy Floor Look Like Marble

Allow the Resin to Cure
After application, allow the resin to cure for the recommended duration before applying a top coat for added protection and a final touch to your 3D resin floor.
- Curing time is a critical step in the installation process of a 3D resin floor as it ensures proper bonding and durability of the flooring. Patience during this phase is key, as rushing the curing process can lead to issues such as bubbling or uneven finish.
- The application of a top coat serves as a protective layer, guarding your resin floor against daily wear and tear, stains, and UV damage. The top coat enhances the aesthetics by providing a glossy finish that elevates the overall look of the floor.
Tips for Maintaining a 3D Resin Floor
To keep your 3D resin floor in top condition, follow these maintenance tips including regular care routines, UV protection measures, and proper cleaning techniques.
- Regular care routines are essential to prevent dirt and debris buildup on your resin floor. Sweeping or vacuuming the surface on a weekly basis can help maintain its pristine appearance.
- Applying a UV-resistant sealant can protect the floor from discoloration or deterioration caused by sunlight exposure.
- When cleaning the floor, use a mild detergent and water solution to gently remove stains without damaging the resin surface.
By incorporating these practices into your maintenance routine, you can ensure that your 3D resin floor remains visually appealing and durable for years to come.
What are the Common Mistakes to Avoid when Laying a 3D Resin Floor?
Avoid these common mistakes when laying a 3D resin floor to ensure a smooth surface and flawless finish, preventing issues that may impact the overall quality of the flooring.
- One crucial mistake to avoid is neglecting the importance of surface preparation. A rough or uneven surface can lead to poor adhesion of the resin, resulting in a bumpy finish and potential delamination.
- Failing to properly clean and degrease the substrate before application can cause bonding issues, leading to areas of the floor that may peel or bubble over time.
- It’s essential to follow manufacturer guidelines for surface preparation and ensure that the substrate is clean, dry, and free from any contaminants for a successful 3D resin floor installation.